Here are samples of what you will find in Section 1
of the downloadable Tutorial on Excel macros
Print this page to read it at home, at the office, on the bus or the train
Excel Macros Section 1: Programming Macros in Excel
In this first section you will learn how easy it is to record macros with the Macro Recorder and to create other macros of your own in the Visual Basic Editor.
You will discover that:
- the Macro Recorder is not only a recorder but it is the best teacher and it will be a great assistant (writing code for you) even when you become an expert at programming in VBA.
- the Visual Basic Editor is the most user friendly development environment that tells you immediately if there are mistakes in your sentences so that you do not have to wait at the end of your project to realize that something that you have written is wrong.
- in the Visual Basic Editor you will create these powerful and useful userforms
- in the Visual Basic editor you will test your macros step by step, modify them and improve them.
After section 1, you will be able to copy all the macros available on the internet and use them efficiently in your own workbooks
Here is a sample of what you will find in chapter 1
of the downloadable Tutorial on Excel macros
of the downloadable Tutorial on Excel macros
The Visual Basic Editor in Excel (VBE)
When you want somebody to do some work for you, you open your Email program and you send him a message in a language that he understands (English, Spanish, French...). When you want Excel to do some work for you, you open the Visual Basic Editor and you write the instructions in a language that Excel understands VBA (Visual Basic for Application).
You will develop, test and modify VBA procedures (macros) in the Excel Visual Basic Editor (VBE). It is a very user-friendly development environment. VBA procedures developed in the VBE become part of the workbook in which they are developed and when the workbook is saved the VBA components (including macros, modules, userforms and other components that you will discover in the next 32 lessons) are saved at the same time. So, when you send the workbook to the "Recycling Bin" the VBA procedures (macros) are destroyed.
Notes
Special note for users of Excel 2007: Until the 2007 versions of Excel the user did not need to install anything to work with macros in Excel. If you are using Excel 2007 see how to install the Visual Basic Editor for Excel from your Office CD.
IMPORTANT NOTE 1: There are no risks to your computer or to Excel in completing the task below. At any time if you feel uncomfortable, just close Excel without saving the workbook and try again later.
For users of Excel 1997 to 2006: The first thing that you need to do is to make sure that the security level of Excel is set at either "Low" or "Medium" so that you can use the macros (VBA procedures) that you develop. From the menu bar of Excel select "Tools" then "Macro" then "Security" and select "Medium".
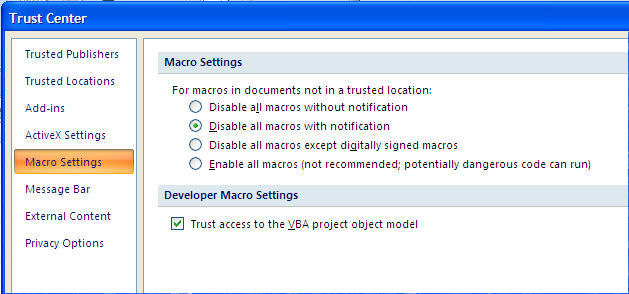
For users of Excel 2007 to 2013: From the "Developer" ribbon click on the "Macro Security" button. Check the second level "Disable all Macros with Notification" and you are set.
Setting up the Visual Basic Editor in Excel (VBE)
The Visual Basic Editor is a program within Excel that allows you to communicate with Excel. We will open it and start by setting it up so that working within it becomes easy and efficient.
Print this page, open Excel and open a new workbook (Book1).
On your keyboard press the "ALT" key (left of the space bar) and hold, strike the "F11"key (the F11 key is at the top of your keyboard).You now see the Visual Basic Editor. Again press "ALT/F11" and you are back into Excel. Use the "ALT/F11" key to go from Excel to the VBA and back.
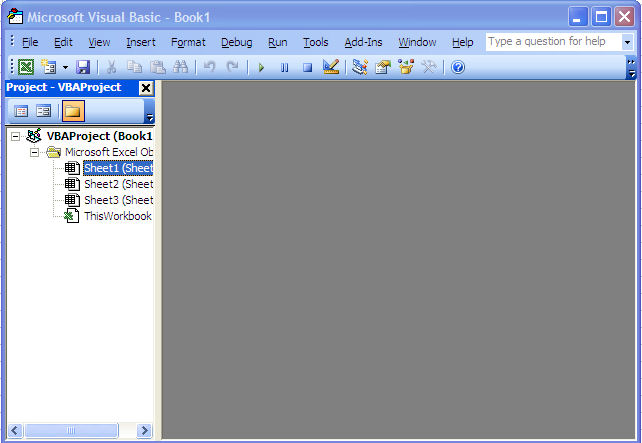
When you first open the VBE you will see is a window somewhat like the image below.
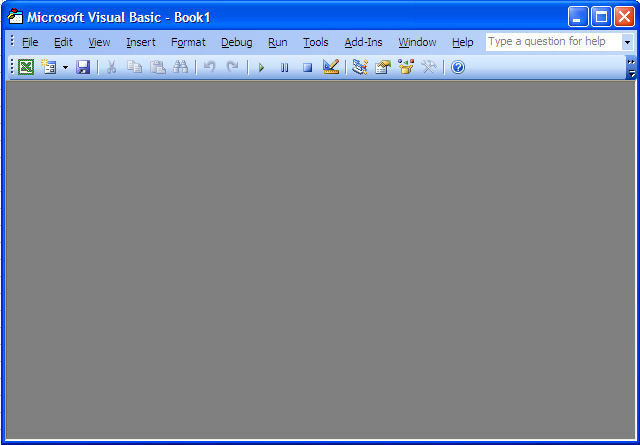
If there are any open windows within the VBE like in the image below click on the Xs to close them and see a gray rectangle filling up the bottom part of the screen like in the image above.
The Three Windows in the Visual Basic Editor
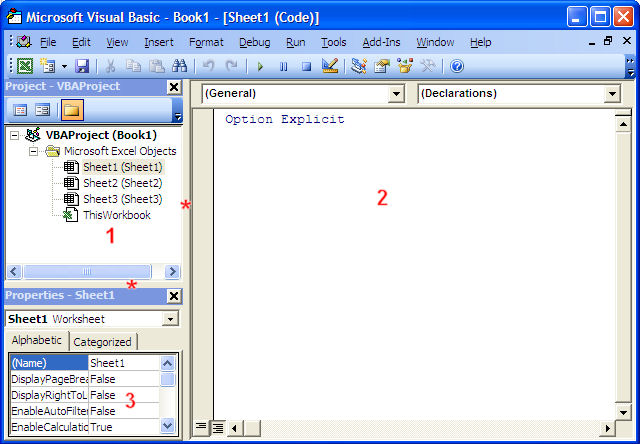
To be efficient when working with the VBE there should always be 3 windows showing like in the image below; the Project Window (1), the Code Window ( 2), and the Properties Window (3), arranged as in the image below. You can resize the windows by left-clicking where the red stars are, holding and moving sideways or up and down. We will study each of the three windows in lessons 2, 3 and 4 but first we will set them up in the VBE.
In the exercise below we will setup the 3 windows of the VBE.
Exercise 1 (Create your first macro and use it)
Remember that you will perform this task only once as each time you will open the VBE it will remain setup.
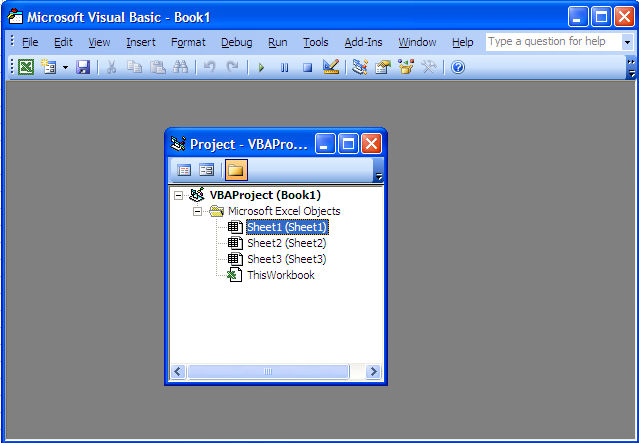
Step 1: Close all the windows that are open in the VBE to end up with this:
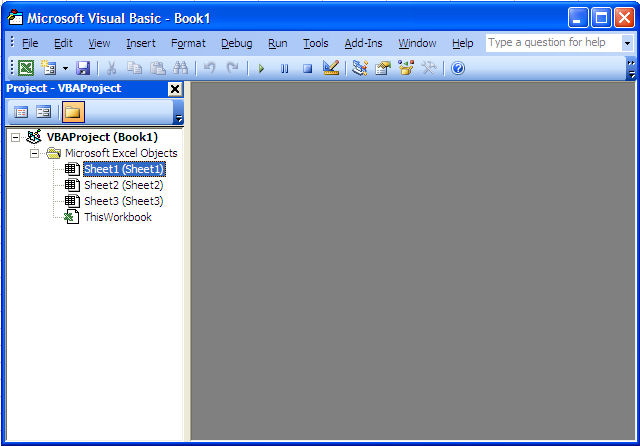
Step 2: Go to the menu bar "View" and click "Project Explorer". The result will be somewhat like the image below:
If the project window already appears as a column on the left side of the screen there is nothing else that you have to do for now. If the project window appears in the middle of the gray area like above, right-click in the white space in the middle of the project window and check "Dockable". Then click on the top blue bar of the Project window, hold and drag it left until the cursor (white arrow) touches the middle of the left side of the screen. When you let go of the mouse button the end result should be like shown in the image below. Congratulations you have setup the first major window of the VBE.
Step 3: Move your cursor on the line separating the project window and the gray rectangle. When it turns to two small parallel lines and arrows click, hold and move the lines sideways. Resize the two windows as you want them.
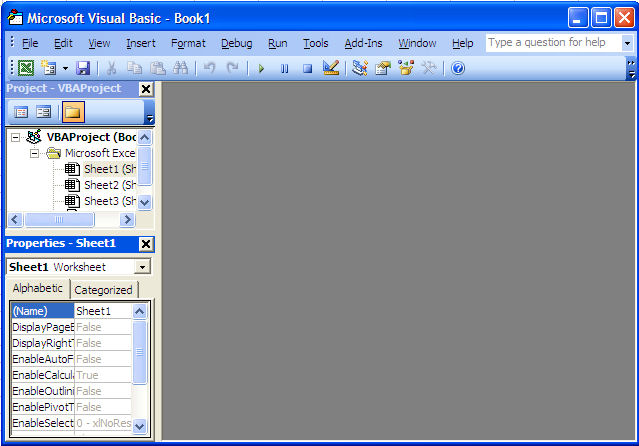
Step 4: Go back to the menu bar "View" and click "Properties Window". The Properties window will appear somewhat like in the image below.

If the Properties window is already located below the Project window there is nothing left to do. If it shows like in the image above, right-click in the white space in the middle of the Properties window and check "Dockable". Then click on the top blue bar of the Properties window and drag it left and down until the cursor (white arrow) touches the center of the bottom of the Project window. When you let go of the mouse button the end result should be as the image below. Congratulations you have setup the second major window of the VBE.
Step 5: Move your cursor on the line separating the project window and the properties window. When it turns to two small parallel lines and arrows click, hold and move the lines vertically. Resize the two windows as you want them.
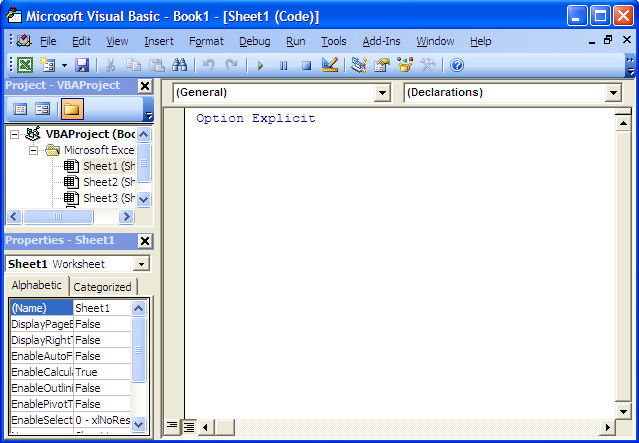
Step 6: To add the code window to the setup, you just have to double click on the name of a component in the Project window (Sheet1, Sheet2, Sheet3 or ThisWorkbook) and its code window appears within the gray rectangle. You can maximize any Code window by clicking on its "Maximize" button  .
.
The final result looks like the image below. The words "Option Explicit" might not be present in your Code window. We will address this issue later in the lesson on variables (Lesson 19). You might also have a VBAProject named FUNCRES.XLA or FUNCRES.XLAM in the project window. Forget about this project for now.
Step 6: Now go to Excel and close it. Re-open Excel, go to the VBE (ALT/F11) and you will see that the VBE setup persists. Congratulations, you are now ready to work in the Visual Basic Editor.
We will discover more about each of these three windows in chapter s 2 (Project Window), 3 (Properties Window) and 4 (Code Windows).
Remember that you can use "ALT/F11" to navigate from Excel to the VBE and back.
Close the VBE and close Excel without saving anything.
Here is a sample of what you will find in chapter 2
of the downloadable Tutorial on Excel macros
of the downloadable Tutorial on Excel macros
The Project Window in the VBE of Excel
Note: Print this page, open Excel and a open a new workbook. Use ALT/F11 to open the Visual Basic Editor as you learned in lesson 1.
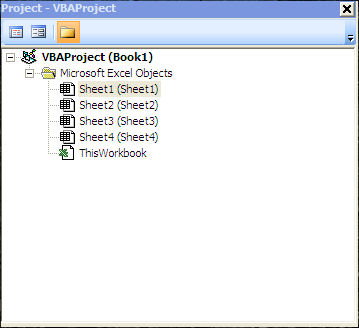
As you can see, the Project window shows you all the workbooks that are open ("Book1") in the example below) and their components. You can use the + and - signs to show the details.
A new Excel workbook includes three sheets and another component named "ThisWorkbook". As we will see later in lesson 9 on events "ThisWorkbook" is a component in which you will store the macros ( also called VBA procedures) that should start automatically when the workbook is opened.
Working within the Project Window
We will now complete a brief exercise to learn how easy it is to work within the Project Window.
Exercise 2 (Create your first macro and use it)
Step 1: Using the ALT/F11 key go back to Excel.
Step 2: Add a sheet. Right-click on the tab of Sheet2 and select "Insert".
Step 3: In the dialog window that appears, click on "OK".

Step 4: Using the "ALT/F11" key, go back to the Visual Basic Editor and see that a sheet has been added to the workbook. Notice that the worksheets are sorted alphabetically in the Project window even if they are not in the workbook.
If you have purchased and downloaded the course on Excel Macros and opened the Excel file "vba-tutorial-editor.xls" plus a new workbook you will see this:
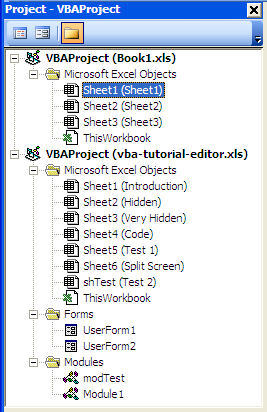
In the picture above you can see that the VBAProject named "Book1.xls" has 3 sheets and ThisWorkbook.The workbook "vba-tutorial-editor.xls" has 7 sheets, two userforms, two modules plus the "ThisWorkbook" object.
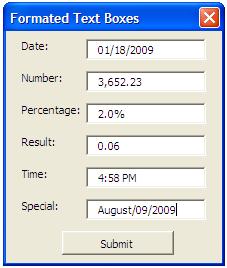
- Userforms are dialog windows (see example image below) that you develop to communicate with the users of your Excel programs and ask them to supply information or make choices.
- Modules are folders in which you save one or many of your macros. You can export and save these modules to be used later in other workbook.
In the complete lesson 2 you will learn how to add any type of components and how to remove, import, export and manage them from the Project window.
Close the VBE and close Excel without saving anything.
Here is a sample of what you will find in chapter 3
of the downloadable Tutorial on Excel macros
of the downloadable Tutorial on Excel macros
The Properties Window in the VBE of Excel
Note: Print this page, open Excel and a open a new workbook. Use ALT/F11 to open the Visual Basic Editor as you learned in lesson 1.
The Properties window shows you the properties of the component that is selected in the Project Window (single click). For example in the new workbook if you single click on "Sheet1" in the Project Window you see the properties of sheet1 in the Properties Window like in the image below.
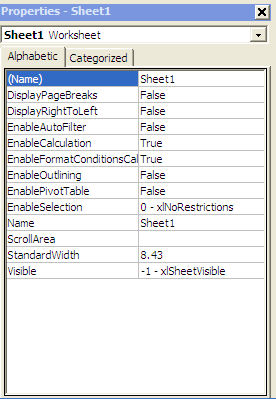
As you can see, a worksheet has 12 properties that you can change in this Properties window. Notice that there are 2 "Name" properties. On the first line there is the programmatical name of the sheet (Sheet1). You will discover later the advantages and disadvantages of changing this property. The second "Name" property (9th line) is the name (or caption) that appears on the tab of the sheet in Excel.
Changing the "Name" Property
Exercise 3 (Create your first macro and use it)
Step 1: Go to Excel (ALT/F11) and notice the names on the three tabs of "Sheet1" as in the image below.
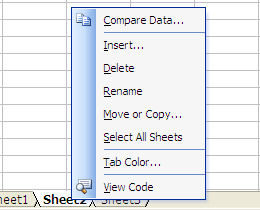
Step 2: We will change the name (Caption) on the tab of "sheet1" to "Introduction". To do so right-click on the tab of the sheet and the following dialog window appears:
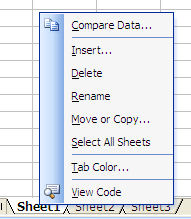
Step 3: Select "Rename". The menu disappears and the name of Sheet1 is highlighted. Enter "Introduction" and this new name will replace "Sheet1" when you click "Enter". The end result is illustrated in the image below.
Step 4: Come back to the Visual Basic Editor (ALT/F11) and notice in the Properties window that the property "Name" (the ninth property, the one without the parentheses) has changed to "Introduction
As you have now learned the name of the sheet can be changed from Excel. We will now complete another smal exercise to change the name from the VBE Properties window.
Exercise 4 (Create your first macro and use it)
Step 1: In the VBE select "Sheet2" in the Project window. On line 9 of the Properties window double-cllck on "Sheet2" and enter the name Spreadsheet. Click "Enter"
Step 2: Go to Excel and notice that you now have a sheet named "Spreadsheet" .
Setting and modifying properties of objects in the Properties Windows is something that you will have to do a lot when you start developing userforms (see lessons 24 to 33).
Until then you will change a small number of properties including the very important "Visible" property of the sheets to one of its three values. To see the equivalent of the image below, select Sheet2(Spreadsheet) in the Project window. Click on the word "Visible" on the 12th line of the Properties window. A dropdown arrow appears in the cell to the right. Click on the arrow and you can select one of the three properties.
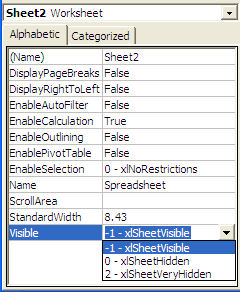
In lesson 3 of the downloadable the tutorial on VBA for Excel you will discover how useful the "xlSheetVeryHidden" property can be. This property of a sheet can be used -- for example, to hide salaries in a budgeting application or prices in an estimation application -- making sensitive data inaccessible to the unauthorized users of your workbooks.
You will also learn how to name your modules and work with a few other properties of the objects appearing in the Project Window.
Close the VBE an
Here is a sample of what you will find in chapter 4
of the downloadable Tutorial on Excel macros
of the downloadable Tutorial on Excel macros
The Code Window in the VBE of Excel
Note: Print this page, open Excel and a open a new workbook. Use ALT/F11 to navigate from the Visual Basic Editor to Excel as you learned in lesson 1.
The Code Window is where 90% of the VBA work is done; writing VBA sentences, testing your VBA procedures (macros) and modifying them when needed.
To illustrate everything that you can do in the Code window we will start by creating a small macro in an empty workbook.
Exercise 6 (Create your first macro and use it)
Step 1: In Excel notice that cells A1, A2 and A3 of "Sheet1" are empty. Go to the Visual Basic Editor.
Step 2: Double click on "Sheet1" in the Project Window. On the right is the Code window of "Sheet1"
Step 2: Double click on "Sheet1" in the Project Window. On the right is the Code window of "Sheet1"
For the purpose of this exercise we will develop a small macro within the code window of a sheet. You will later develop the habit of creating modules and organizing your macros within them.
Step 3: Click anywhere in the Code window
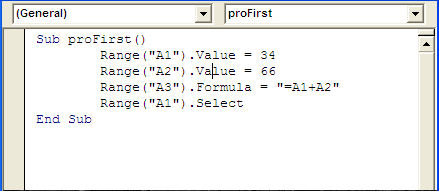
Step 4: You can either copy/paste the following macro from your browser to the code window of "Sheet1" or key it in.
If you decide to key it in you will start by entering the first line and then when you press enter the VBE will add the final Line "End Sub". Enter the rest of the code within the two lines. Make sure that everything is there including all the quotation marks, periods, parentheses, equal signs and spaces.
Sub proFirst()
Range("A1").Value = 34
Range("A2").Value = 66
Range("A3").Formula = "=A1+A2"
Range("A1").Select
End Sub
Range("A1").Value = 34
Range("A2").Value = 66
Range("A3").Formula = "=A1+A2"
Range("A1").Select
End Sub
Step 5: Click on any line of the macro, go to the menu bar at the top of the VBE screen and click "Run" then click "Run Sub/Userform".
Step 6: Go to Excel (ALT/F11) and see what has happened to cells A1, A2 and A3
Congratulations you have run and tested you first macro. Go to Excel and "Sheet1" and see that what the macro was ordering Excel to do has been done. The value of cell "A1" is 34, the value of cell "A2" is 66 and there is a formula in cell A3 that sums cells A1 and A2.
Step 7: Go to Excel and clear the cells A1, A2 and A3 of "Sheet1". On the menu bar go to "Tool" and click on "Macros". In the dialog window select "proFirst" and click on run.
You have run the macro from the menu bar of Excel. In lesson 9 on Events you will discover many other ways to start a macro.
NOTE: You cannot change the font or its color in the code window. You input appears in black, comments appear in green, reserved words in blue and when you make a mistake the font color turns to red.
NOTE: For many users of an earlier versions of Excel the wheel of the mouse wheel does not work in the code window. To enable your mouse, download and install the free fix offered in thedownloadable tutorial.
There are plenty of other operations that you can execute in the code window. For example, you can test a macro line by line (step by step), go back a few lines and make corrections, use breakpoints to test only part of a macro.
In section 2 (VBA lessons 11 to 23) you will learn the VBA vocabulary to write macros.
Here is a sample of what you will find in chapter 5
of the downloadable Tutorial on Excel macros
of the downloadable Tutorial on Excel macros
Developing Macros in Excel
Note: Print this page, open Excel and a open a new workbook. Use ALT/F11 to open the Visual Basic Editor as you learned in lesson 1.
Most macros are developed in the code window of modules. For the purpose of this exercise double click on "Sheet1" in the project window
Enter sub proTest() without using a capital "S" as the beginning of "sub". After entering the closing parenthesis click on "Enter". You get these two lines of code:
Sub proTest()
End Sub
VBE adds the line "End Sub" and capitalizes the "S" of "Sub" . The VBE capitalizes letters appropriately when the word is spelled correctly. This is one interesting feature that you should always use when writing macros. Make it tour habit never to use capital letters when writing code. In this way, whenever VBE unexpected fails to capitalize a letter, you will know that something is wrong.
Two exceptions to your otherwise consistent use of lower-case are: (1), when you declare variables (lesson 19); and (2), when you name macros (as you did above). You will see why in later lessons.
You may now write a procedure within the two lines of code above. For example your VBA procedure could look like this. You can copy/paste the macro below from your browser to the VBE Code window, or key it in. Make sure that everything is there including all the quotation marks and periods, parentheses, equal signs, and spaces.
Note: Make sure that you copy/paste this code in a NEW workbook not one created in a previous exercise.
Sub proTest()
Sheets("Sheet1").Select
Range("C1").Select
Range("C1").Select
Do Until Selection.Offset(0, -2).Value = ""
Selection.Value = Selection.Offset(0, -2).Value & " " & Selection.Offset(0, -1)
Selection.Offset(1, 0).Select
Loop
Selection.Value = Selection.Offset(0, -2).Value & " " & Selection.Offset(0, -1)
Selection.Offset(1, 0).Select
Loop
Range("A1").Select
End Sub
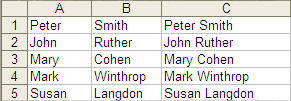
The procedure above will go down column "C" and assemble the first names of column "A" and the last names of column "B" with a space in between. It will perform this task all the way down until there are no more first names in column "A" . It will then place the cursor in cell "A1".
To test this macro (VBA procedure) follow the steps below:
Step 1: Go to Excel (ALT/F11) and enter first names in cell A1 to A5.
Step 2: Enter surnames in cells B1 to B5.

Step 3: Come back to the VBE (ALT/F11) and click within the macro in the code window.
Step 4: From the menu bar select "Run/Run Sub/Userform".
Step 5: Go back to Excel and see the result.
You can erase everything in column C Excel and retry with more names and surnames.
Try it again removing the first name in cell A3. Notice that the macro stops on line 2.
Here is a sample of what you will find in chapter 6
of the downloadable Tutorial on Excel macros
of the downloadable Tutorial on Excel macros
Testing Macros in the VBE for Excel
Testing the VBA procedure step by step
NOTE: While you are running the macro step by step you can stop the execution at any time by clicking on the stop button in the toolbar. 
Testing is the most time-consuming part of any VBA project. During the development of a project you will use 20% of your time analysing and designing, 15% programming and 65% testing.
During the testing phase, you will correct bugs, typos and the logical errors. More importantly you will improve your original project, fine tune it, discover better ways to do things and add code.
In lesson 4 you have created your first macro and tested it using the "Run" button. You can also test a macro step by step.
Print this page, open Excel and a open a new workbook. Use ALT/F11 to open the Visual Basic Editor as you learned in lesson 1.
Step 1: Go to Excel and make sure that cells A1, A2 and A3 of Sheet1 are empty.
Step 2: In VBE go to the Code window of Sheet1 and copy/paste the following macro:
Sub proFirst()
Range("A1").Value = 34
Range("A2").Value = 66
Range("A3").Formula = "=A1+A2"
Range("A1").Select
End Sub
Range("A1").Value = 34
Range("A2").Value = 66
Range("A3").Formula = "=A1+A2"
Range("A1").Select
End Sub
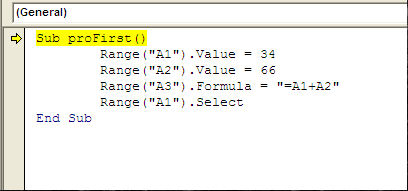
Step 3: Click anywhere within the macro and then press the F8 key at the top of your keyboard. VBE highlights the first line of code in yellow.
Step 4: Right-click on the small yellow arrow and see a menu appear
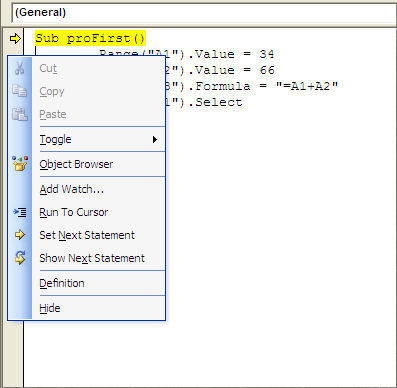
In lesson 4 of the downloadable Tutorial on VBA for Excel you will learn about these precious menu items and everything else that you can do in the Code window. For now let's finish testing this macro step by step.
Step 5: Press on "F8" a second time. No line has been executed yet and if you go to Excel you will see that cells A1 to A3 are still empty. The next time you press "F8" , VBE will execute the yellow-highlighted line.
Step 6: Press "F8" a third time. The yellow-highlighted line is now "Range("A2").Value = 66". VBE has executed the previous line "Range("A1").Value = 34" has been executed so if you go to Excel (ALT/F11) you will see 32 in cell A1.
Step 7: Come back to VBE (ALT/F11) and press "F8" again. Go to Excel and see what happened in cell A2.
Step 8: Come back to VBE (ALT/F11) and press "F8" again. Go to Excel and see that there is a formula in cell A3.
Step 9: Come back to the VBE (ALT/F11) and press "F8" again, cell A1 is now selected in Excel.
Step 10: Press "F8" again. Nothing happens in Excel but "End Sub" is highlighted in yellow
Step 11: Press "F8" again. Nothing happens in Excel no more lines in VBE are highlighted in yellow.
The macro hac been tested, the test is over.
In the code change the addresses A1, A2 and A3 respectively to B1, B2 and B3. Test the macro again. Do it as many times as you want.
You have tested a macro step by step. In the downloadable tutorial you will learn how to test parts of a macro, how to come back a few lines, make changes and re-execute these lines. You will also discover this most important functionality, how to share the screen between Excel and VBE.
In no other programming environment can you test a procedure step by step while seeing it at work in the spreadsheet on a single screen.
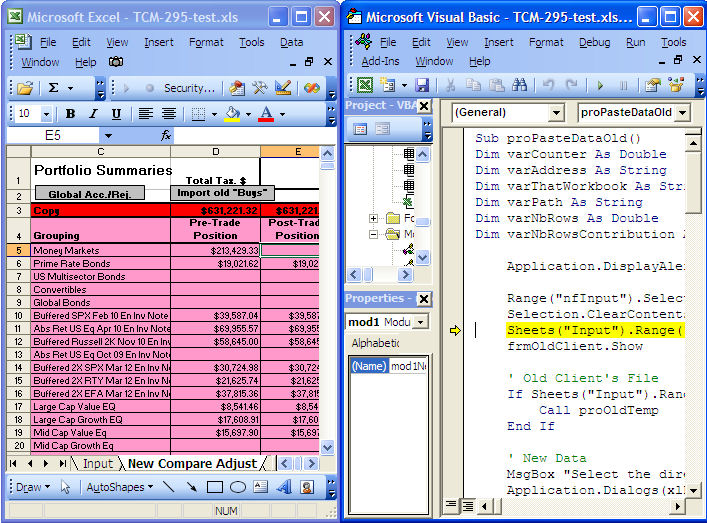
In the picture below you can see the Visual Basic Editor on the left side of a screen and Excel on the right side. While you press the F8 key to execute the macro step by step in the Visual Basic Editor, you can see what is happening in the Excel spreadsheet. You will discover the split screen function in lesson 6 of thedownloadable the course on VBA for Excel (Macros).
Here is a sample of what you will find in chapter chapter 7
of the downloadable Tutorial on Excel macros
of the downloadable Tutorial on Excel macros
The Macro Recorder
IMPORTANT NOTE 1: There are no risks to your computer or to Excel in completing the exercises below. At any time if you feel uncomfortable just close Excel without saving the workbook and retry later.
IMPORTANT NOTE 2 (for Excel 2007 ONLY) : You can only complete the exercises below if you have installed VBA for Excel on your computer. If you do not have, click here.
One of the tools that makes the programming environment in Excel unique is the Excel Macro Recorder. When you start the macro recorder anything you do in Excel is recorded as a new macro. That makes the macro recorder the best VBA teacher and also a great assistant who will write a lot of the words and sentences that you need without a single typo. It will also be there when you do not remember something that you do not use often. Even after many years of programming you will still use the macro recorder daily not to learn anymore but to write code (VBA words and sentences).
With the Excel macro recorder you can not develop a macro that will damage Excel or your computer so try anything and learn.
In this lesson on line you will record a macro and run it.
Recording Your First New Macro:
Step 1: Print this page.
Step 2: Open Excel and a new workbook.
Step 3: Go to the "Developer" ribbon to click on 
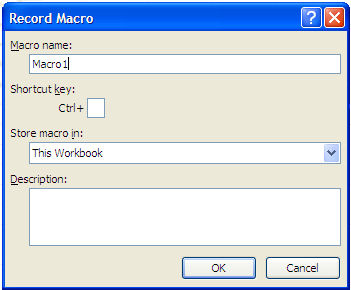
Step 4: A small window appears titled "Record Macro". We will review its components in thedownloadable tutorial. For now just click on "OK".
When you do so the small window disappears and in the "Developer" ribbon is replaced by  telling you that you are going in the right direction. The macro recorder is ON.
Step 5: In the sheet below (Sheet1) select cells B1 to B5, go to "Sheet2", select cell B6, come back to "Sheet1" and select cells D2 to D5.
Step 6: In the "Developer" ribbon click on
Step 1: Select cell "A1" of "Sheet1".
Step 2: In the "Developer" ribbon click on 
Step 3: In the window that appears Macro1 is selected.
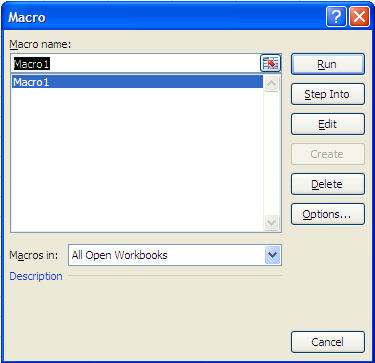
Again we will forget about the components of this window because we will study them in thedownloadable tutorial. For now, just click "Run".
Step 4: See how fast the macro runs. You do not even see Excel go to Sheet2 (but it does). At the end of the execution cells D2 to D5 are selected.
What took you around 5 seconds to do manually (step 5 of the first exercise) took Excel a fraction of a second. Excel can work much faster than you can. Welcome to the marvelous world of VBA for Excel (Macros).
You can repeat steps 1 to 4 of this second exercise as often as you like.
Looking at your first recorded macro
To complete this third exercise you must have studied chapters 1 to 4.
Go to the Visual Basic editor and you will see the following macro in the code window when you double click on Module 1 in the Project Window:
Sub Macro1()
' Macro1 Macro
Range("B1:B5").Select
Sheets("Sheet2").Select
Range("B6").Select
Sheets("Sheet1").Select
Range("D2:D5").Select
Sheets("Sheet2").Select
Range("B6").Select
Sheets("Sheet1").Select
Range("D2:D5").Select
End Sub
As you can see the macro recorder recorded your instructions in a language that Excel understands (VBA). You can now use VBA's written code to have Excel perform this task.
Never forget that the Excel macro recorder is your best teacher and will remain a great assistant for the rest of your VBA developer's life.
Here is a sample of what you will find in chapter 8
of the downloadable Tutorial on Excel macros
of the downloadable Tutorial on Excel macros
Macros Help and Assistance
There is plenty of help and assistance available within Excel when you develop macros. As you have discovered in the previous lesson the Macro Recorder is a great teacher and assistant. In this lesson we investigate the two other sources of assistance within the Visual Basic Editor of Excel: the Help Files and the Object Browser.
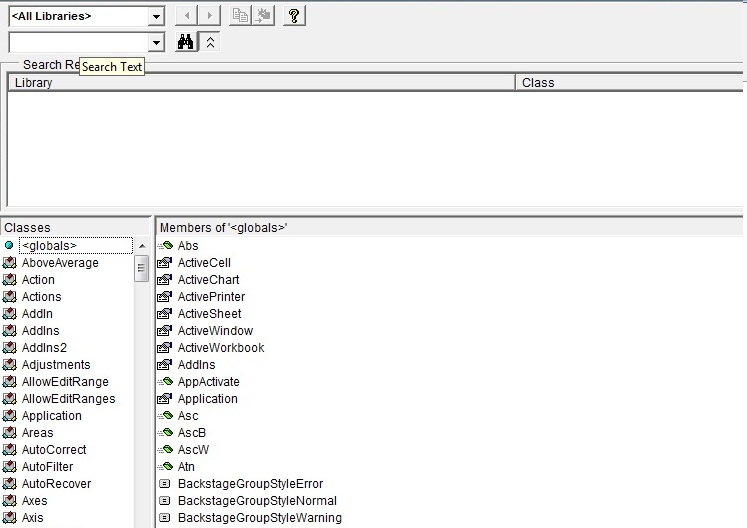
Here is how the Object Browser appers when you call it. ALL the VBA words are presented in this tool including useful examples. The search function is powerful.
Here is a sample of what you will find in chapter 9
of the downloadable Tutorial on Excel macros
of the downloadable Tutorial on Excel macros
Starting, triggering a Macro in Excel
Note 2: Print this page, open Excel and a open a new workbook. Use ALT/F11 to open the Visual Basic Editor as you learned in lesson 1.
When does the VBA procedure (macro) start? When an EVENT happens. The event is what triggers the VBA Excel procedure. In earlier lessons you have used an event to start your macros. In the Visual Basic Editor you have gone to the menu bar and clicked on "Run/Run Sub/Userform" and the macro was executed. You have also clicked on the F8 key at the top of your keyboard and the macro got executed line by line.
You do not want your user to go to the Visual Basic Editor to trigger a macro. A lot of other events can happen to start a macro. The event that is mostly (85%) of macros used is clicking on a button. The button can be on the worksheet or on a userform that you would develop. The event can also be: opening the workbook, selecting a sheet, the value of a cell changing due to a manual input or due to the recalculation of a formula, clicking on a selected keystroke or going to the right menu item in Excel.
Preparing the Exercise on Events
To complete the following exercises, copy paste the code below from your browser to the code window of "Sheet1" of the new Excel workbook as you have learned in previous lessons.
Sub proFirst()
Range("A1" ).Value = 34
Range("A2" ).Value = 66
Range("A3" ).Formula = "=A1+A2"
Range("A2" ).Value = 66
Range("A3" ).Formula = "=A1+A2"
Range("A1" ).Select
End Sub
Macros Triggered from the Developer Ribbon
Step 1: Select "Macros" from the "Developer" ribbon. You will see the "Macro" dialog window below.
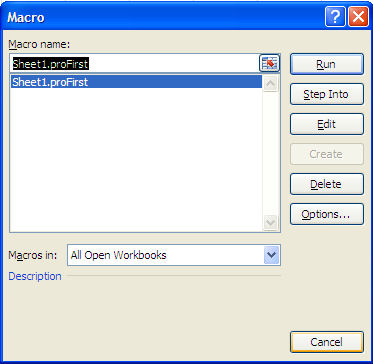
Step 2: "Sheet1.proFirst" being selected in the list box and its name appearing in the text box above the list box just click "Run". The macro is automatically executed
Step 3: Erase the contents of cells A1, A2 and A3
You now see that colleagues must have installed VBA on their own computer to be able to use your macros from the "Developer" ribbon.
Macros Triggered by a Keystroke
In this second first exercise on events we will get the macro to be keyboard activated by capital "s" (Shift/S). First you need to program a key. To do so:
Step 1: Select "Macros" from the "Developer" ribbon. You will see the "Macro" dialog window below.
Step 2: "Sheet1.proFirst" being selected in the list box and its name appearing in the text box above the list box just click on "Options". A new dialog window "Macro Options" appears:

Step 3: In the shortcut key text box enter a capital "s" "SHIFT/s" and then click "OK". Click "Cancel" in the dialog window
Step 4: If you now click "CTRL/SHIFT/S" the macro will be executed instantly.
Macros Triggered by Clicking on a Text Box on the Worksheet
More than 90% of the macros are triggered by a click on a button located on a worksheet.
We prefer using text boxes rather than VBA command buttons because they are much easier to maintain and allow much more creativity in the design. You can use the font that you like and the background color that fits your needs. If you are a little creative you can add 3D effects, special borders and others.
Step 1: From the "Insert ribbon" click on the "Text Box" icon once. Lower the curser toward the sheet, click and hold the left button of the mouse and stretch the text box to the desired dimension.
Step 2: Right click on the text box, select "Assign Macro" from the menu and the "Assign Macro" dialog window appears:
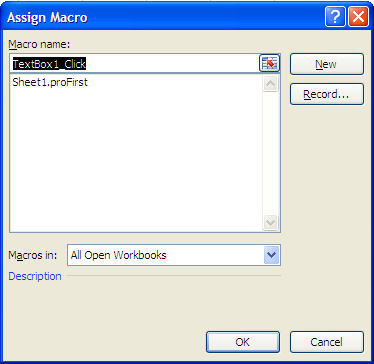
Step 3: Select "Sheet1.proFirst" from the list box and its name appears in the text box above the list box just click on "OK".
Step 3: Click away from the text box on the Excel sheet.
Step 4: Left click on the text box and the macro is executed.
You can assign macros to text boxes, images or WordArt using the same approach.
Here is a sample of what you will find in lchapter10
of the downloadable Tutorial on Excel macros
of the downloadable Tutorial on Excel macros
VBA Macros Security and Protection in Excel
Note 1: You will change the security setting one single time. You will not have to do it again. Tell your colleagues about it specially if you want to send them Excel workbooks with macros. The setting suggested here is totally safe and you will not make your computer vulnerable to any virus.
Special note for users of Excel 2007: See how to install the Visual Basic Editor from your Office CDand set the security level of your Excel.
If you send a workbook with macros to a colleague and he can not get them to work it is probably because his security setting is at "High" . Tell him how to change his level of security by going to the "Developer" ribbon, clicking on "Macro Security", selecting "Macro Settings and checking the second level "Disable all Macros with Notification" and you are set.
From then on each time you open a workbook that contains macros a temporary status bar appears above the grid in Excel:
Click on "Options" and the following dialog window will appear.
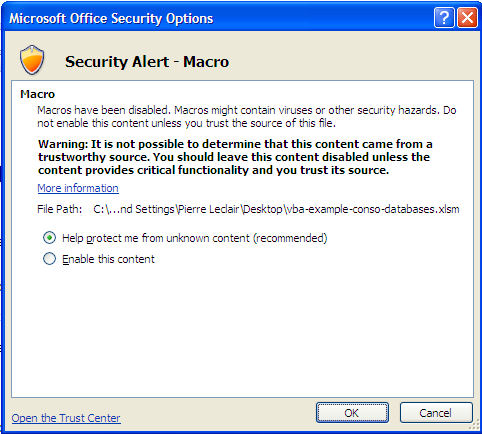
Adopt the same attitude as you have with documents attached to Emails. If you know the origin of the file you may enable the macros if not click on "Disable Macros" and you are fully protected. You can look at the workbook but the VBA procedures (macros) are not operational. You can go to the Visual Basic Editor to take a look at the macros. If nothing looks suspicious close the workbook and re-open it enabling the macros.
Password Protecting the code
As an Excel-VBA Developer you might want to protect your code so that nobody else may modify it. In the VBE editor go to "Tools/VBAProject Properties/Protection" . Check the box and submit a password. Make sure that you save the password somewhere that you will remember. If ever you loose the password for an important workbook you can always buy a program on the Internet that will allow you to view the code even if it is password protected.
Remember that passwords are like any locks, they only keep the honest people out.
To organize your discovery of Excel macros, the downloadable Tutorial on Excel Macros is divided in three sections (all 3 sections part of the single download):
Section 1: Excel Macros Programming (Chapters 1 to 10)This section is about recording, writing, modifying and testing macros in the Visual Basic Editor. You will also learn about security and discover "events" (an event is what starts the macro).
Section 2: Excel VBA Vocabulary (Chapters 11 to 23)
Developing a macro is communicating with Excel and to do so you need to use a language called Visual Basic for Applications (VBA). In section 2 you will learn all the VBA vocabulary that is essential to work with business data (accounting, sales, production and others).
Developing a macro is communicating with Excel and to do so you need to use a language called Visual Basic for Applications (VBA). In section 2 you will learn all the VBA vocabulary that is essential to work with business data (accounting, sales, production and others).
Section 3: Forms and Controls in VBA for Exce (Chapters 24 to 33)The userform is a small or large dialog window that you create and allows the user to submit values that will be used by your macros. To these userforms you will add controls (command buttons, text boxes, list boxes and others) and program them.